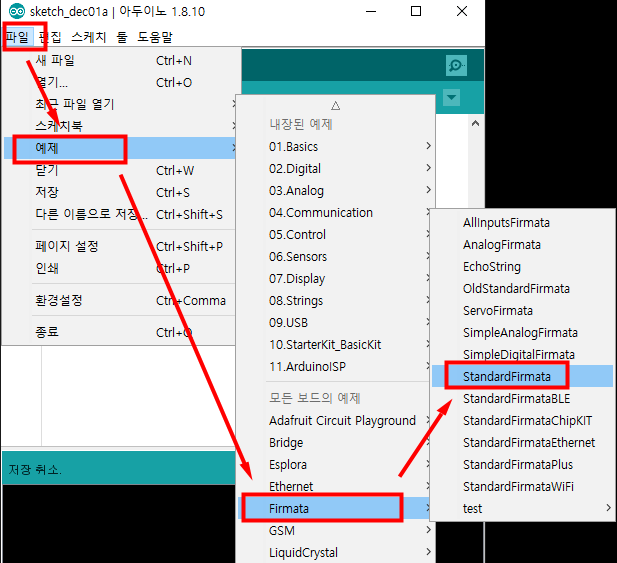
1. 아두이노에 firmata 설치하기

예제를 읽어들인 후 아두이노에 업로드한다.
2. pyfirmata 설치하기
3. 파이썬으로 코딩하기
3.1 디지털핀
디지털 핀의 경우 pyfirmata의 Arduino 객체의 get_pin() 메서드를 이용한다.
import pyfirmata as pf import time
ard = pf.Arduino('COM7') ard.get_pin('d:13:o') #디지털핀 13번을 출력으로 설정 while True: ard.digital[13].write(1) time.sleep(0.5) ard.digital[13].write(0) time.sleep(0.5) |
또는
import pyfirmata as pf import time
ard = pf.Arduino('COM7') p13 = ard.get_pin('d:13:o') #디지털핀 13번을 출력으로 설정 while True: p13.write(1) time.sleep(0.5) p13.write(0) time.sleep(0.5) |
3.2 아날로그핀
import pyfirmata as pf import time
ard = pf.Arduino('COM7') print('connected.')
# 아날로그핀을 사용하려면 반드시 아래와 같은 두 줄이 필요함. pf.util.Iterator(ard).start() ard.analog[0].enable_reporting()
while True: a0 = ard.analog[0].read() # [0,1]범위의 실수 반환 print(a0) |
또는
import pyfirmata as pf import time
ard = pf.Arduino('COM7')
pf.util.Iterator(ard).start() ard.analog[0].enable_reporting() a0p = ard.get_pin('a:0:i')
while True: a0 = a0p.read() print(a0) |
3.3 pwm
아두이노 우노는 pwm기능이 3,5,6,9,10,11번 핀에만 있다.
import pyfirmata as pf import time from math import pi, sin
ard = pf.Arduino('COM7') pwm = ard.get_pin('d:10:p')
gap = 2*pi/100 t = 0 while True: y = (sin(t)+1)/2 pwm.write(y) t += gap time.sleep(0.01) |
A0핀에 가변저항이 연결되어 있다고 가정했을 때 11번 핀에 연결된 LED의 밝기를 가변저항으로 제어하는 예제는 다음과 같다.
import pyfirmata as pf import time
ard = pf.Arduino('COM7') pwm = ard.get_pin('d:10:p')
pf.util.Iterator(ard).start() ard.analog[0].enable_reporting()
while True: a0 = ard.analog[0].read() pwm.write(a0) print(a0) |
3.4 서보모터
import pyfirmata
DELAY = 1 MIN = 5 MAX = 175 MID = 90
board = pyfirmata.Arduino('COM7')
servo = board.get_pin('d:11:s') #11번핀을 서보모터 신호선으로 설정 def move_servo(v): servo.write(v) board.pass_time(DELAY)
move_servo(MIN) move_servo(MAX) move_servo(MID)
board.exit() |
