실패...


from machine import Pin, I2C

i2c = I2C(Pin(5), Pin(4))


그다음


i2c.scan( )


으로 연결된 아두이노의 주소가 검색이 안된다.

원인을 못 찾았음..

Posted by 살레시오
,

  i2c에서 통신은 프로토콜 특성상 항상 마스터에서 요구하며. 마스터에서 전송할 때도 그렇고 슬레이브에서 읽어올 때도 마스터에서 먼저 요구하면 슬레이브에서 그 요구를 받아서 데이터를 전송한다.


 아두이노의 Wire라이브러리를 이용하면 Wire.onReceive() 함수와 Wire.onRequest() 함수를 이용하여 핸들러 함수를 등록해야 한다.


Wire.onReceive( _onReceive ); #데이터를 받는다.
Wire.onRequest( _onRequest ); #데이터를 보낸다.

smbus의 관련함수들은 다음과 같다.


read_i2c_block_data(addr, cmd [, length] )
write_i2c_block_data(addr, cmd, lst)

smbus의 write_2ic_block_data() 함수는 다음과 같이 데이터를 전송하기 위해서 _onReceive()함수를 호출하게 된다. 전송되는 데이터의 첫 바이트가 cmd라는 것을 유의해야 한다. _onReceive( len)함수의 인수도 cmd까지 고려한 길이가 인수로 넘어간다.


cmd

lst[0]

lst[1]

...

lst[-1]


 그런데 smbus의 read_2ic_block_data()함수는 cmd 한 바이트를 먼저 전송한 후 데이터를 읽는다. 즉, 실제 동작은 _onReceive()함수가 먼저 호출되고 그 다음 _onRequest()함수를 호출한다. 따라서 예를 들면 아두이노의 핸들러 함수는 다음과 같이 작성해야 한다.


byte _cmd_i2c;
byte _rcvBuf[32];

void _onReceive(int count) {
   _cmd_i2c = Wire.read(); // 첫 바이트는 *항상* command

   //만약 smbus.read_i2c_block_data()호출이라면 여기서 종료되고
   //바로 _onRequest() 함수가 호출된다.
   if (count > 1) {
       _rcvBuf[0] = _cmd_i2c;
       _idx = 1;
       while(Wire.available())
           _rcvBuf[_idx++] = Wire.read();
   }
}

void _HRP_::_onRequest() {
   switch(_cmd_i2c) {
       // _cmd_i2c 에 따라 해당 데이터를 전
   }
}

위와 같이 작성하면 master에서 전송된 데이터는 command까지 포함해서 모두 _rcvBuf 배열에 저장되고 데이터를 전송하는 경우에는 _cmd_i2c 변수의 내용에 따라 각기 다른 데이터를 전송할 수 있다.

n{rp005}


'연구 > Ardpy' 카테고리의 다른 글

Ardpy API reference  (0) 2016.10.23
Ardpy examples  (0) 2016.10.23
Ardpy setup  (0) 2016.10.23
About Ardpy  (0) 2016.10.23
ardpy 개발 동기  (0) 2016.05.02
Posted by 살레시오
,

Ardpy API reference

연구/Ardpy 2016. 10. 23. 09:42

Ardpy : Arduino controlled by python

1. ardpy : python package

1.1 Ardpy class


name

action

property

addr

get/set i2c address

device_id

get device id number

num_funcs

get number of functions callable

max_arg_num

get maximum number of arguments

method

_set_arg(val, index=0, dtype=’byte)

set argument data

_exec_fucn(val)

execute function in arduino


1.2 Arduno class

1.3 Ledm class

1.4 Tlcd class


2. Ardpy : arduino library

2.1 public methods

method declaration

action

byte begin(byte addr, uint32_t dev_id = 0xffffffff)

void add_func( void (*func)(void) )

void set_max_arg_num(byte num)

int8_t   get_int8(byte index=0)
uint8_t  get_uint8(byte index=0)
uint8_t  get_byte(byte index=0)
int16_t  get_int16(byte index=0)
int16_t  get_int(byte index=0)
uint16_t get_uint16(byte index = 0)
int32_t  get_int32(byte index = 0)
uint32_t get_uint32(byte index = 0)
float    get_float(byte index = 0)
char*    get_str(byte index = 0)

void set_ret(int8_t)
void set_ret(uint8_t)
void set_ret(int16_t)
void set_ret(uint16_t)
void set_ret(int32_t)
void set_ret(uint32_t)
void set_ret(float)


'연구 > Ardpy' 카테고리의 다른 글

python3-smbus 와 아두이노간 통신 동작  (0) 2016.10.25
Ardpy examples  (0) 2016.10.23
Ardpy setup  (0) 2016.10.23
About Ardpy  (0) 2016.10.23
ardpy 개발 동기  (0) 2016.05.02
Posted by 살레시오
,

Ardpy examples

연구/Ardpy 2016. 10. 23. 09:41

Ardpy : Arduino controlled by python

1. first example


 The Arduino function can be called from python shell very easily like this.


python3

arduino program

>>> from ardpy import *


>>> ard = Ardpy(0x10) #make  Ardpy object


>>> ard._exec_func(0) # ledon() call

>>> ard._exec_func(1) # ledoff() call

#include <Wire.h>

#include <Ardpy.h>


void ledon() {

   digitalWrite(13, HIGH);

}


void ledoff() {

   digitalWrite(13, LOW);

}


void setup() {

   pinMode(13, OUTPUT);

   Ardpy.add_func(ledon);// function 0

   Ardpy.add_func(ledoff);// funciton 1

   Ardpy.begin(0x10);

}


void loop() {

}


In the Arduino program (right side), the two functions ledon() and ledoff() are registered by Ardpy.add_func(). Firstly registered function has number 0 and secondly registered one has number 1.


 In the python shell, you can simply create Ardpy object and by using the method _exec_func() the arduino functions called. That is, _exec_func(0) executes ledon() Arduino function, and _exec_func(1) executes ledoff().


 The registered Arduino function using Ardpy.add_func() must be void(input)-void(output) function. How to transmit input arguments and how to get returned value are explained in the next example.

2. second example

 Using _set_arg() method in Ardpy class, you can transmit arguments to the Arduino function. In the Arduino side, Ardpy class has methods to receive the arguments from python. (for example get_byte(), get_int(), etc.). Ardpy class of Arduino side also has the method set_ret() that transmits an obtained (or calculated) value to the python side. The following example is for calling ananlogRead() function of the Arduino board using python script.


python3

Arduino program

>>> from ardpy import *


>>> ard = Ardpy(0x10)


>>> ard._set_arg(0)  # set pin as 0(A0)

>>> ret0 = ard._exec_func(0) # aread()


>>> ard._set_arg(3)  # set pin as 3(A3)

>>> ret1 = ard._exec_func(0) # aread()


#include <Wire.h>

#include <Ardpy.h>


void aread() {

   byte pin = Ardpy.get_byte();

   int ret = analogRead(pin);

   Ardpy.set_ret(ret);

}


void setup() {

   Ardpy.add_func(aread);// function 0

   Ardpy.begin(0x10);

}


void loop() {

}


The ADC value (ret variable in aread() function in right hand side) of Arduino is sent to the python by set_ret() method. The return value of _exec_func() python method is the ADC value received from Arduino. Thus variable ret0 and ret1 (left hand side) is the resulting ADC values (ret variable in aread() function) of Arduino. (right hand side)


 The python method _set_arg() can transmit various data types. Refer to API page.


'연구 > Ardpy' 카테고리의 다른 글

python3-smbus 와 아두이노간 통신 동작  (0) 2016.10.25
Ardpy API reference  (0) 2016.10.23
Ardpy setup  (0) 2016.10.23
About Ardpy  (0) 2016.10.23
ardpy 개발 동기  (0) 2016.05.02
Posted by 살레시오
,

Ardpy setup

연구/Ardpy 2016. 10. 23. 09:39

Ardpy : Arduino controlled by python


 ardpy, the pyhon3 package, contains Arduino llibrary ‘Ardpy’ that makes it very easy to communicate between Arduino and Raspberry pi using python via i2c protocol. Before using it, the following configure procedures are required.

1. configuring i2c for Raspberry pi

 You must configure Raspberry pi to enable i2c. Refer to the follwing page:

Configure i2c : Raspberry pi

2. connect wires for i2c between Arduino and Raspberry pi

 The GPIO pins on Raspberry pi use 3.3V while most Arduino boards are activated on 5V. Thus, a voltage level converter is required. The level-converting circuit is very simple and one can easily buy a low-priced hardware module. (for example, see fig. 1)

[fig. 1] voltage level converter


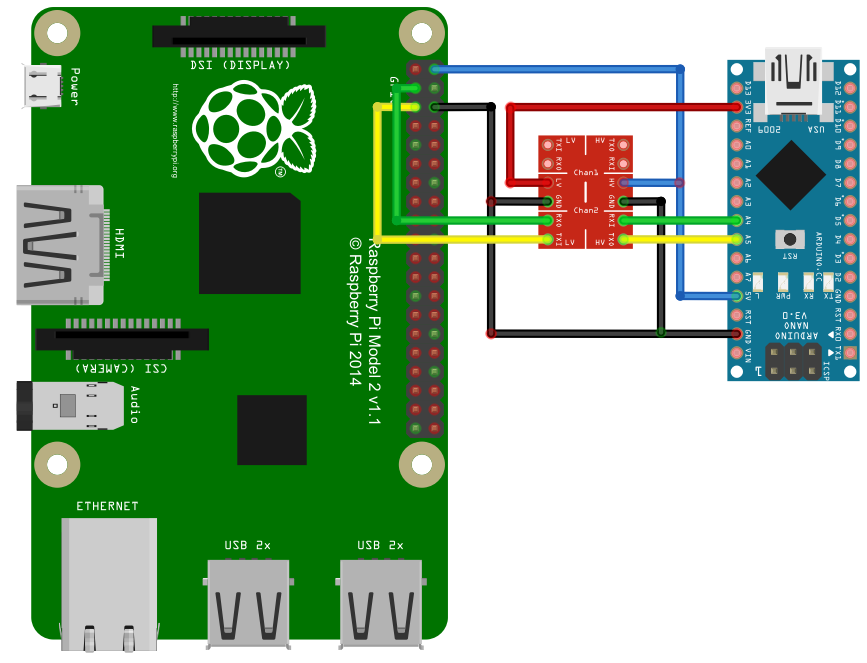
Using this voltage level converter, wiring between Raspberry pi and Arduino nano are illustrated in fig. 2.


[fig, 2] wiring for i2c communication between RPi and Arduino nano

3. installing Ardpy arduino library

 You can use PC or Raspberry pi to program Arduino board. If you use PC, download Ardpy.zip at the following github release page:


https://github.com/salesiopark/Ardpy/releases


After downloading, in the Arduino IDE, navigate to Sketch > Include Library. At the top of the drop down list, select the option to "Add .ZIP Library''. You will be prompted to select the library you would like to add. Navigate to the Ardpy.zip file's location and open it.


[fig.3] add arduino zipped library in Mac PC


 If you use Raspberry pi to develop Arduino board, install Arduino IDE first using the following command.


$ sudo apt-get install arduino


Then, after executing IDE, the following directory created in the user home directory.


~/sketchbook/libraries


In this directory, Arduino library files are to be located. Go to that directory and download Ardpy library files (Ardpy.h, Ardpy.cpp, keywords,txt) using the following git command.


sudo git clone https://github.com/salesiopark/Ardpy.git


Then, the Ardpy directory is automatically created and the following files with some other source files  are copied into it.


Ardpy.h

Ardpy.cpp

keyword.txt


3.3 test Ardpy library are properly installed


If the Ardpy library is properly installed, the following Arduino program must be successfully compiled without errors, Note that <Wire.h> must be included before <Ardpy.h> header file.


#include <Wire.h>  // <== must be included before Ardpy.h

#include <Ardpy.h>


void setup() {

   Ardpy.begin(0x10); //0x10 is an i2c address

}


void loop(){

}


 The Ardpy.begin() method initiates i2c communication and the first argument to the function is i2c address (0x03~0x77). If this is download into Arduino board and if it is correctly wired to the Raspberry pi’s i2c pins (refer fig. 2), the i2cdetect command must show the 0x10 address as follows.


$ i2cdetect -y 1
    0  1  2  3  4   5   6   7   8   9   10  a   b   c   d   e   f
00:          --  --  --  --  --  --  --  --  --  --  --  --  --  --
10:  10  --  --  --  --  --  --  --  --  --  --  --  --  --  --  --
20:  --  --  --  --  --  --  --  --  --  --  --  --  --  --  --  --
30:  --  --  --  --  --  --  --  --  --  --  --  --  --  --  --  --
40:  --  --  --  --  --  --  --  --  --  --  --  --  --  --  --  --
50:  --  --  --  --  --  --  --  --  --  --  --  --  --  --  --  --
60:  --  --  --  --  --  --  --  --  --  --  --  --  --  --  --  --
70:  --  --  --  --  --  --  --

4. installing python package

 The ardpy package is programmed using python3 (not python2) and, in case of raspbian, python3 is pre-installed. And ardpy requires smbus package. Thus, it must be installed before installing ardpy. Note that python3-smbus is to be installed. (not for python2)


$ sudo apt-get update

$ sudo apt-get install python3-smbus


Then, ardpy can be easily installed using the following command.


$ sudo python3 -m pip install ardpy

After that, in the python3 shell, it must be imported without error.


>>> import ardpy

This is it. All the pre-configures are completed. Some example codes are here.


'연구 > Ardpy' 카테고리의 다른 글

Ardpy API reference  (0) 2016.10.23
Ardpy examples  (0) 2016.10.23
About Ardpy  (0) 2016.10.23
ardpy 개발 동기  (0) 2016.05.02
파이썬의 smbus 패키지를 이용하여 i2c 통신하기  (0) 2015.11.25
Posted by 살레시오
,

About Ardpy

연구/Ardpy 2016. 10. 23. 09:34

Ardpy : Arduino controlled by python


 The ardpy is a python and Arduino library that makes it easy to control Arduino board using python via i2c communication. This package contains Ardpy library for Arduino that automates i2c communication.


 If the Raspberry Pi is set to enable i2c and is wired to the Arduino through i2c pins (SCL/SDL), you can call the Arduino function using python method in ardpy package. The following figure illustrates how to wire Raspberry Pi and Arduino nano through voltage level converter. (refer setup page)


 For example, you can call the analogRead() function of the Adruino in the python shell as:


python3 shell in Raspberry Pi

Arduino program

>>> from ardpy import *

>>> ard = Ardpy(0x10) # 0x10 is i2c addr

>>> ard._set_byte(0)  # set port as A0

>>> ret = ard._exec_func(0) # call aread()

#include <Wire.h>

#include <Ardpy.h>


void aread() {

   byte pin = Ardpy.get_byte();

   int ret = analogRead(pin);

   Ardpy.set_ret(ret);

}


void setup() {

   Ardpy.add_func(aread);// func 0

   Ardpy.begin(0x10); // 0x10 is i2c addr

}


void loop() {

}


 As seen in this example, you can make your own arduino application board controllable by python very easily using Ardpy.


c{ardpy001}


'연구 > Ardpy' 카테고리의 다른 글

Ardpy API reference  (0) 2016.10.23
Ardpy examples  (0) 2016.10.23
Ardpy setup  (0) 2016.10.23
ardpy 개발 동기  (0) 2016.05.02
파이썬의 smbus 패키지를 이용하여 i2c 통신하기  (0) 2015.11.25
Posted by 살레시오
,

Introduction

 The ESPyHarp is a simple IDE for developing MicroPython program. It’s target board is ESP8266 based boards (e.g. NodeMCU) with MicroPython firmware. I like both ESP8266 and MicroPython. However, I had found the fact that there is no useful development tool (or IDE). So, I started to develop IDE for  personal use and named it ESPyHarp. It is written using JavaFX and an open source libraries such as RichTextFX, jSSC, etc. You can see or download the source code in github.com page.


Features

  • embedded REPL

  • files list in the device

  • code editor with python keyword and builtins highlight

  • upload and/or execute  python script

Requirements

 You need JVM(Java Virtual Machine) on your PC to run ESPyHarp. Then, download the released file below and execute ESPyHarp.jar file. On Windows you can run the jar file just double clicking on it. At this moment, I have tested only on Windows 7 PC.

Releases

ESPyHarp ver 0.1.1 (03/Oct/2016) : minor REPL bug fix

ESPyHarp ver 0.1.0 (01/Oct/2016) : initial release


c{espy}n{espy006}


Posted by 살레시오
,

  JavaFX 8u40 버전에 간단한 대화창/경고창 클래스들이 추가되었다.(참조) 예를 들어 경고창은 다음과 같이 간단히 생성할 수 있다.


Alert alert = new Alert(AlertType.WARNING);
alert.setTitle("Warning Dialog");
alert.setHeaderText("Look, a Warning Dialog");
alert.setContentText("Careful with the next step!");

alert.showAndWait();


동일한 Alert객체로 확인창도 생성할 수 있다.


Alert alert = new Alert(AlertType.CONFIRMATION);
alert.setTitle("Confirmation Dialog");
alert.setHeaderText("Look, a Confirmation Dialog");
alert.setContentText("Are you ok with this?");

Optional<ButtonType> result = alert.showAndWait();
if (result.get() == ButtonType.OK){
   // ... user chose OK
} else {
   // ... user chose CANCEL or closed the dialog
}


또는 간단한 문자열 입력기도 다음과 같이 간단히 생성하여 문자열을 입력받아 후처리를 할 수 있다.


TextInputDialog dialog = new TextInputDialog("walter");
dialog.setTitle("Text Input Dialog");
dialog.setHeaderText("Look, a Text Input Dialog");
dialog.setContentText("Please enter your name:");

result.ifPresent(name -> System.out.println("Your name: " + name));


 이전에는 이런 간단한 기능도 별도로 구현하기가 까다로웠는데 이제는 쉽게 할 수 있다.

n{espy}n{005}


Posted by 살레시오
,

  파이썬은 tab키를 보통 네 개의 공백문자로 치환하여 표시한다. richtextfx 라이브러리의 CodeArea 에서 이것을 수행하려면 다음 중 하나를 사용해야 한다.


codeArea.addEventFilter(KeyEvent.KEY_PRESSED, (keyEvent) -> {
   if (keyEvent.getCode() == KeyCode.TAB) {
       codeArea.insertText(codeArea.getCaretPosition(), "    ");
       keyEvent.consume();
   }
});

아래의 두 개는 동작 방식이 유사하다.


codeArea.addEventHandler(KeyEvent.KEY_PRESSED, (keyEvent) -> {
   if (keyEvent.getCode() == KeyCode.TAB) {
       codeArea.insertText(codeArea.getCaretPosition(), "    ");
       keyEvent.consume();
   }
});

codeArea.setOnKeyPressed( (keyEvent) -> {
   if (keyEvent.getCode() == KeyCode.TAB) {
       codeArea.insertText(codeArea.getCaretPosition(), "    ");
       keyEvent.consume();
   }
});

이들 중 가장 첫 번째 방법은 키입력이 처리되지 전에 람다함수가 호출되어 keyEvent.consume() 함수가 듣는다. 즉, tab키를 누르면 tab문자가 입력되기 전에 람다함수가 호출되고 그 안에서 consume() 되므로 결과적으로 공백문자들(4개)만 입력된다. 따라서 이 방법을 사용해야 한다.


 하지만 그 다음 두 개는 키입력이 된 다음에 람다함수가 호출된다. 따라서 consume()함수는 호출하나 마나이다. 이 경우 tab키를 누르면 먼저 입력창에 tab 문자가 입력되고 그 뒤에 공백문자들이 붙는다.


c{espy}n{004}


Posted by 살레시오
,

  RichTextFX.CodeArea에 scroll bar를 붙이려면 다음과 같이 VirtualizedScrollPane 을 생성하여 Node에 붙여야 한다.


caREPL = new CodeArea();
caREPL.setWrapText(true);// 이렇게 하면 HScrollBar는 안 생긴다.
VirtualizedScrollPane caREPLS = new VirtualizedScrollPane<>(caREPL);
apane.getChildren().add(caREPLS); // apane은 anchorPane 객체

// 상하좌우 여백을 0으로 만들어 anchorPane에 fill 시킨다.

AnchorPane.setRightAnchor(caREPLS, .0); // (Node, Double)
AnchorPane.setLeftAnchor(caREPLS, .0);
AnchorPane.setBottomAnchor(caREPLS, .0);
AnchorPane.setTopAnchor(caREPLS, .0);

이렇게 하면 줄이 화면을 넘어갈 때 자동으로 세로 스크롤바가 생성된다.


 만약 위와 같이 test wrap 을 활성화시키면 가로 스크롤바는 생성되지 않지만 비활성화시킨다면 가로 스크롤바도 생성된다.


c{espy}n{espy003}


Posted by 살레시오
,